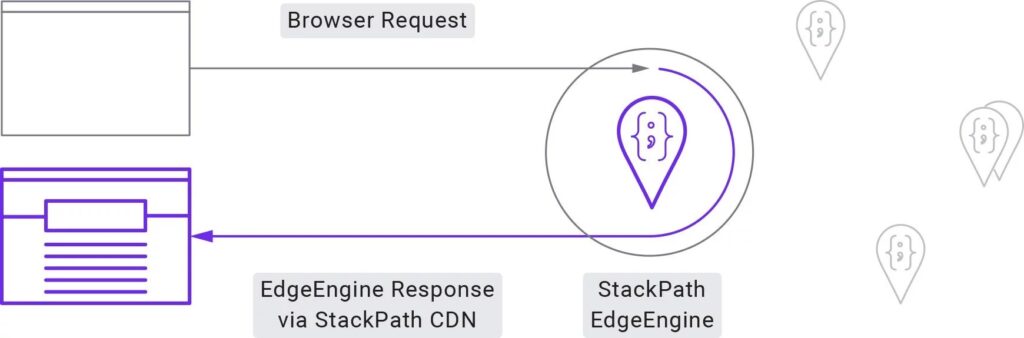
EdgeEngine is StackPath’s serverless platform. It allows you to add custom logic to your applications or even build entire applications on the edge.
With StackPath’s recently announced EdgeEngine CLI this allows for more intuitive developer workflows and to manage your EdgeEngine scripts right where the source of your application also lives.
One great use for the CLI is integrating it with version control. This way your scripts are version controlled just as your regular code would, allowing you to iterate on versions and to introduce code reviews.
In this tutorial
In this tutorial, you’ll learn how to …
… include CLI scripts in version control
… integrate the CLI with GitLab CI/CD
… make an IP firewall with EdgeEngine
… display a notice depending on the users’ country.
Although this tutorial is specifically tailored to GitLab CI/CD, many of the concepts apply to other CI/CD platforms as well.
Prerequisites
In this tutorial, we’ll deploy 2 scripts to our fictive site; ‘my-global-site.stackpath.com’. One script to modify the request on the home and one script to limit access to the admin page by IP.
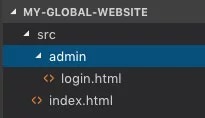
Our site will consist of 2 pages, index.html, and admin/login.html. In this tutorial, we’ll see the admin-directory as something only to be accessed from a certain network.
You’ll need a CDN site configured with StackPath. We have my-global-site.stackpath.com as the delivery domain and my-global-site-origin.stackpath.com (notice the -origin) as the origin.
For this tutorial, the origin can be hosted just about anywhere. This might be on your VPS, hosting platform, or elsewhere.
When using the EdgeEngine’s CLI in combination with GitLab CI/CD, you can make code review a required part of deployment and use more fine-grained access control to deploy.
You’ll need to have the EdgeEngine scripts in your repository. For example in ./edgeengine/{script-name}.js.
Just deploy to master (or another configured branch) to deploy.
Step 1: Moving EdgeEngine scripts into your repository
For this step, we’ll assume you already have a repository for your website or web-application set up. If you don’t, you may refer to this tutorial by GitHub.
For this tutorial, I’ve created a repository that has the following file structure:
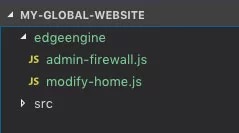
I have the strong of the website of our test site set up in ~/projects/my-global-website and I’ll be adding my scripts to ~/projects/my-global-website/edgeengine, but you could choose any directory (e.g., edgeengine-scripts, scripts, src/edgeengine, etc).
I’ve added the scripts so that the directory structure now is:
The scripts don’t have actual features yet but simply pass the request through to the origin, using StackPath’s example script:
// sample script
  addEventListener("fetch", event => {
      event.respondWith(handleRequest(event.request));
  });

  /**
   * Fetch and return the request body
   * @param {Request} request
   */
  async function handleRequest(request) {
      // Wrap your script in a try/catch and return the error stack to view error information
      try {
          /* The request can be modified here before sending it with fetch */

          const response = await fetch(request);

          /* The response can be modified here before returning it */

          return response;
      } catch (e) {
          return new Response(e.stack || e, {
              status: 500
          });
      }
  }
Step 2: Using the CLI locally
We now have the scripts next to the source files of our website, but no way to deploy them to EdgeEngine – yet.
Let’s start by installing the CLI on our local machine. You can find the installation instructions at the CLI’s repository.
Verify that the CLI has been installed by running edgeengine, without any flags. You should see something along the lines of:
Deploy to Stackpath EdgeEngine from your local machine.

VERSION
 @stackpath/edgeengine-cli/1.0.0 darwin-x64 node-v10.15.0

USAGE
 $ edgeengine [COMMAND]

COMMANDS
 auth    Configures StackPath's authentication details.
 deploy  Deploys the scripts in the working directory according to its edgeengine.json configuration file.
 help    display help for edgeengine
In order for the CLI to know which script can be found where, and where it should be deployed we’ll need to add the EdgeEngine CLI configuration file. Aptly named edgeengine.json.
The best place for this file would be in the root of your project. For this tutorial that would be ~/projects/my-global-site/edgeengine.json.
The configuration consists of a stack ID and a site ID, referring to the stack and the CDN site in StackPath’s control panel respectively. Both are now configured in the “global” scope of the configuration, optionally the site’s ID could be configured on a per-script basis (per-script overrides the global).
In order to deploy the scripts using the newly created configuration file, we’ll first need to set our credentials with the EdgeEngine CLI. You can use the command edgeengine auth for this. The CLI will prompt for your client ID and client secret, both of which can be generated at the API management page in StackPath’s control panel.
After having set the credentials, we can deploy to the EdgeEngine using edgeengine deploy.
Sweet, you’ve now deployed to EdgeEngine from your local machine! You may verify this by logging into the StackPath control panel and looking under the “EdgeEngine”-tab on a CDN-site’s page.
Step 3: Deploying from GitLab CI/CD
When you use GitLab for your version control, it makes perfect sense to move the deploy step into a pipeline. This allows for some very interesting use cases, for example to introduce code reviews. It also allows for way more fine-grained access control, since you don’t have to distribute StackPath credentials to your developers anymore, they can simply push to GitLab to deploy.
Setting Credentials
Just as we had to authenticate locally, we’ll also need to authenticate when using the CLI in a CI/CD pipeline. We’ll have to transfer our credentials to GitLab in a safe manner, luckily GitLab has a feature called “Environment variables”. A way to add environment variables to your pipelines. These variables are not visible to regular GitLab users but are visible to pipeline scripts.
You can find the configuration for these variables in every repository, under “settings”, and then under “CI/CD”. Optionally, you could set the environment variables in your group, so that every repository in that group has access to the credentials.
You’ll need to add the client ID and client secret you configured earlier to the environment variables. You can use any name you’d like, but something like STACKPATH_CLIENT_ID and STACKPATH_CLIENT_SECRET makes sense.
Optionally, you could limit the variables to protected branches and tags. That makes it (nearly) impossible for developers (without maintainer rights) to get access to the variables without going to code review first.
Adding .gitlab-ci.yml
Just as we’ve added a configuration file specific to the EdgeEngine, we’ll also need a file to tell GitLab what to do. GitLab uses YAML instead of JSON and therefore the file ends with .yml.
Here’s a configuration file that will deploy the scripts we’ve defined in edgeengine.json.
Only deploys when someone pushes (or merges) to master.
Installs the EdgeEngine CLI.
Configures the credentials using the GitLab environment variables we set up earlier.
Deploys the scripts using the deploy command.
Notice that this is a very basic GitLab CI configuration and that it has a lot more to offer. Usually, you’d also have the scripts that build, package and deploy the actual site here (e.g. with FTP or SSH).
We now have everything we need in order to deploy from GitLab. For the last step, make sure that you’ve committed all the files we spoke about earlier into version control. In order to deploy you can:
Push to a feature-branch (e.g., added-edgeengine) and then make a merge request to merge it into master, or…
Push directly to master. This will only be possible if the master branch isn’t protected and you have the required rights.
Pushing to the master kicks off the GitLab CI/CD pipeline which will then perform the deployment. You can follow the progress, or – if it fails – see debug information on the “CI/CD”-tab on your repository’s page.