When discussing Kafka at the Edge, one major question should always be asked. Can and should I deploy Apache Kafka at the edge? It is an important question to ask in nearly all industries implementing Kafka, including manufacturing, automation industry, aviation, logistics, and retailing. Kafka at the Edge first requires some background knowledge on Kafka & the Edge. We assume you are familiar with basic Docker knowledge as well as foundational Distributed Computing principles.
Background Information
Before we get too deep into the details of Kafka at the Edge, lets quickly review some information about Kafka.
Kafka:
Kafka is a streaming platform that has three key capabilities:
Publish and subscribe to streams of records, similar to a message queue or enterprise messaging system.
Store streams of records in a fault-tolerant durable way.
Process streams of records as they occur.
Kafka is generally used for two broad classes of applications:
Building real-time streaming data pipelines that reliably get data between systems or applications
Building real-time streaming applications that transform or react to the streams of data
To understand how Kafka does these things, let’s dive in and explore Kafka’s capabilities from the bottom up.
Foundational Concepts to remember:
Kafka is run as a cluster on one or more servers that can span multiple datacenters.
The Kafka cluster stores streams of records in categories called topics.
Each record consists of a key, a value, and a timestamp.
Kafka has four core APIs:
The Producer API allows an application to publish a stream of records to one or more Kafka topics.
The Consumer API allows an application to subscribe to one or more topics and process the stream of records produced to them.
The Streams API allows an application to act as a stream processor, consuming an input stream from one or more topics and producing an output stream to one or more output topics, effectively transforming the input streams to output streams.
The Connector API allows building and running reusable producers or consumers that connect Kafka topics to existing applications or data systems. For example, a connector to a relational database might capture every change to a table.
Multiple Kafka Clusters
Multi-cluster and cross-data center deployments of Apache Kafka have become the norm rather than an exception. A Kafka deployment at the edge can be an independent project. However, in most cases, Kafka at the edge is part of an overall Kafka architecture. For this tutorial we will set up both a producer and consumer at the edge, but bear in mind that this is NOT a traditional or best-practice Kafka architecture.
Many reasons exist to create more than just one Kafka cluster in your organization:
Independent Projects.
Cloud & Edge Hybrid integration.
Taking advantage of StackPath Edge computing.
Low-Latency Data Aggregation.
Faster Migrations.
Instant Disaster recovery.
Low-Latency, High-Demand Global infrastructures (regional or even cross-continent communication).
Apache Kafka at the Edge
When you want to deploy Kafka at the Edge, there are a few different paradigms that exist.
Running Only Consumers at the Edge: Kafka Clients running at the edge. Kafka Cluster deployed in a Data Center or Public Cloud environment.
Running Both Producers and Consumers at the Edge: Kafka Cluster and Kafka Clients (e.g. sensors in the factory) deployed at the edge.
Edge and Beyond: Kafka Cluster deployed at the edge. Kafka Clients (e.g. smartphones in the region) running close to the edge.
How to run a Kafka Producer and Consumer on StackPath
Prerequisites
In order to be able to follow along with this tutorial, you need to have at least the following:
Zookeeper deployed on the edge, or at another location accessible from your container.
A StackPath account.
A host computer with either MacOs, Linux, or Windows installed. ( Note this guide is written using Ubuntu , your output may differ )
Docker sucessfully installed.
( Tip: you can run the following command to check if Docker is installed and running properly )
docker run hello-world
If you see an error, you might have missed a step. Otherwise, this should mean you have Docker running on your machine and can continue to the next step.
Getting prepared
To get started, we need to make sure we have the following information:
The Zookeeper public I.P. address and port number. This can be the public address if you are utilizing a zoopeeker instance that is outside of your StackPath Network. If it is inside your StackPath Network, and you need help finding this, then see the instructions below.
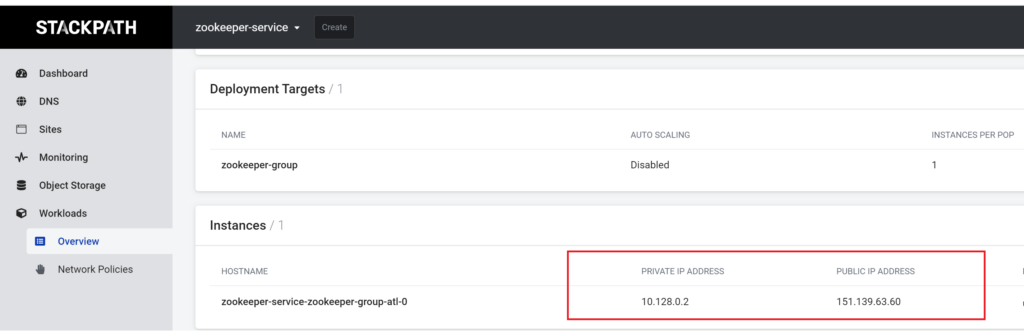
Retrieving the Zookeeper IP address and port number.
If you have Zookeeper up and running on StackPath, then you will be able to retrieve your zookeeper private I.P. address from the Workload page.
Creating the Container
In order to test kafka at the edge, we will utilize a kafka docker image as our parent image, and then we will create a bash script that we will utilize to setup kafka, start kafka, and eventually consume & produce data streams. We will be creating one container and this single container will be capable of both producing and consuming data streams.
How to complete this step:
First we will run the following command in your terminal.
mkdir kafka-at-the-edge
Then cd into the directory like so:
cd kafka-at-the-edge
Run the following to create a new empty Dockerfile
touch Dockerfile
Edit the Dockerfile. We will be using nano, however you can use the editor of your choice.
nano Dockerfile
Paste the following contents.
FROM docker.io/bitnami/kafka:2

COPY scripts/run.sh /opt/bitnami/scripts/kafka/
Info
The FROM command selects our parent image and tells Docker to use docker.io/bitnami/kafka:2
The COPY command overwrites a file called run.sh with our own version. ( We will create this shortly )
Create the a scripts directory with the following command:
mkdir scripts
Then create the run.sh script we mentioned earlier.
touch ./scripts/run.sh
Finally, lets write our run script. We have written a run script and provided it for you below. Note that this can, and should be dramatically different than something running in production as it is written purely for educational purposes.
#!/bin/bash

# shellcheck disable=SC1091

set -o errexit
set -o nounset
set -o pipefail
# set -o xtrace # Uncomment this line for debugging purpose

# Load libraries
. /opt/bitnami/scripts/libkafka.sh
. /opt/bitnami/scripts/libos.sh

##### Constants
BOOTSTRAP_SERVER=localhost:9092
REPLICATION_FACTOR=1
PARTITIONS=1
STARTED_SIGNAL="started (kafka.server.KafkaServer)"

# Load Kafka environment variables
eval "$(kafka_env)"

if [[ "${KAFKA_CFG_LISTENERS:-}" =~ SASL ]] || [[ "${KAFKA_CFG_LISTENER_SECURITY_PROTOCOL_MAP:-}" =~ SASL ]]; then
    export KAFKA_OPTS="-Djava.security.auth.login.config=${KAFKA_CONF_DIR}/kafka_jaas.conf"
fi

flags=("$KAFKA_CONF_FILE")
[[ -z "${KAFKA_EXTRA_FLAGS:-}" ]] || flags=("${flags[@]}" "${KAFKA_EXTRA_FLAGS[@]}")
START_COMMAND=("$KAFKA_HOME/bin/kafka-server-start.sh" "${flags[@]}")

info "** Starting Kafka **"
if am_i_root; then
    grep -q "$STARTED_SIGNAL" <(exec gosu "$KAFKA_DAEMON_USER" "${START_COMMAND[@]}")
else
    grep -q "$STARTED_SIGNAL" <(exec "${START_COMMAND[@]}")
fi

  info "** CHECKING TOPIC **"
if [ "$CREATE_TOPIC" = "yes" ]
then
  ./opt/bitnami/kafka/bin/kafka-topics.sh --create
  --bootstrap-server $BOOTSTRAP_SERVER
  --replication-factor $REPLICATION_FACTOR
  --partitions $PARTITIONS
  --topic $TOPIC || true
fi
  info "** CHECKING ROLE **"
if [ $KAFKA_ROLE = "CONSUME" ]
then
  info "** Starting Kafka Console Consumer **"
  ./opt/bitnami/kafka/bin/kafka-console-consumer.sh --bootstrap-server localhost:9092 --topic $TOPIC --from-beginning
else
  info "** Starting Kafka Console Producer **"
  echo "THIS IS A TEST MESSAGE FOR THE TOPIC - $TOPIC" |  ./opt/bitnami/kafka/bin/kafka-console-producer.sh --broker-list localhost:9092 --topic $TOPIC
fi
Now that we have a run script, lets go ahead and build the docker container with the following command. Please note that you must put your image name and tag in the appropriate place.
docker build . -t :
Here is an example:
chrisaltamimi-epsilonasi@ubuntu:~/workspace/kafka/ $ docker build . -t epsilonasi/kafka:3
Sending build context to Docker daemon   5.12kB
Step 1/2 : FROM docker.io/bitnami/kafka:2
 ---> d7dace0ab82e
Step 2/2 : COPY scripts/run.sh /opt/bitnami/scripts/kafka/
 ---> Using cache
 ---> 845c9382af6e
Successfully built 845c9382af6e
Successfully tagged epsilonasi/kafka:3
Once that is built. Go ahead and push it to your respective registry. In this tutorial we will be pushing it to Dockerhub.
**Well done! You have created a kafka container and pushed it to a container registry. We will now deploy it to StackPath!
Deploying Kafka to StackPath.
Getting started is easy! In order to run Kafka on StackPath we simply do the following:
Naming and selecting the type of workload.
Define environment variables, Networking, Ports, and any custom commands your container requires to run.
Select your Workload spec that each instance will use, additional storage, and the deployment targets where your instances will run.
Lets go ahead and get started. If you are this far down in the guide, we assume you have met the requirements and completed the “getting prepared” sections above.
Step 1 – Creating the first Workload and defining its Type
Info:
In this guide we will deploy TWO workloads. One will be our consumer and one will be our producer.
How to complete this step
First we want to start the Workload creation process by selecting want to create a workload for our Kafka instances.
Go ahead and name your workload. Then we need to select our workload type and our Image. epsilonasi/kafka:3
This will be the workload we use to consume messages. In this example exercise, the kafka-producer will simply send a test message.
Click Continue
Step 2 – Defining environment variables, Networking, Ports, and any custom commands the container requires to run.
Info:
There are a few environment variables we will need to deploy Kafka properly.
KAFKA_CFG_ZOOKEEPER_CONNECT . Set this to your Zookeeper IP address and port number. If you need help locating this, see the information above titled Retrieving the Zookeeper IP address and port number.
ALLOW_PLAINTEXT_LISTENER. Set this to yes . This is a setting that will allow us to easily set up and test our Kafka instances on the edge.
CREATE_TOPIC. For this first workload, we will tell Kafka that we want to create the topic we choose. So set this to yes
KAFKA_ROLE. Since we want this container to be a producer, we will tell Kafka that by setting this to CONSUME
TOPIC. This is the topic that we expect this Kafka container to listen to. For this guide, set it to testTopic
How to complete this step:
First you need to define the environment variables as shown above.
Second, you need to set the public ports if you are using a Kafka instance that is outside the private network available to your Kafka instance.
We do not need to set any commands, and thus your workload settings should appear as such.
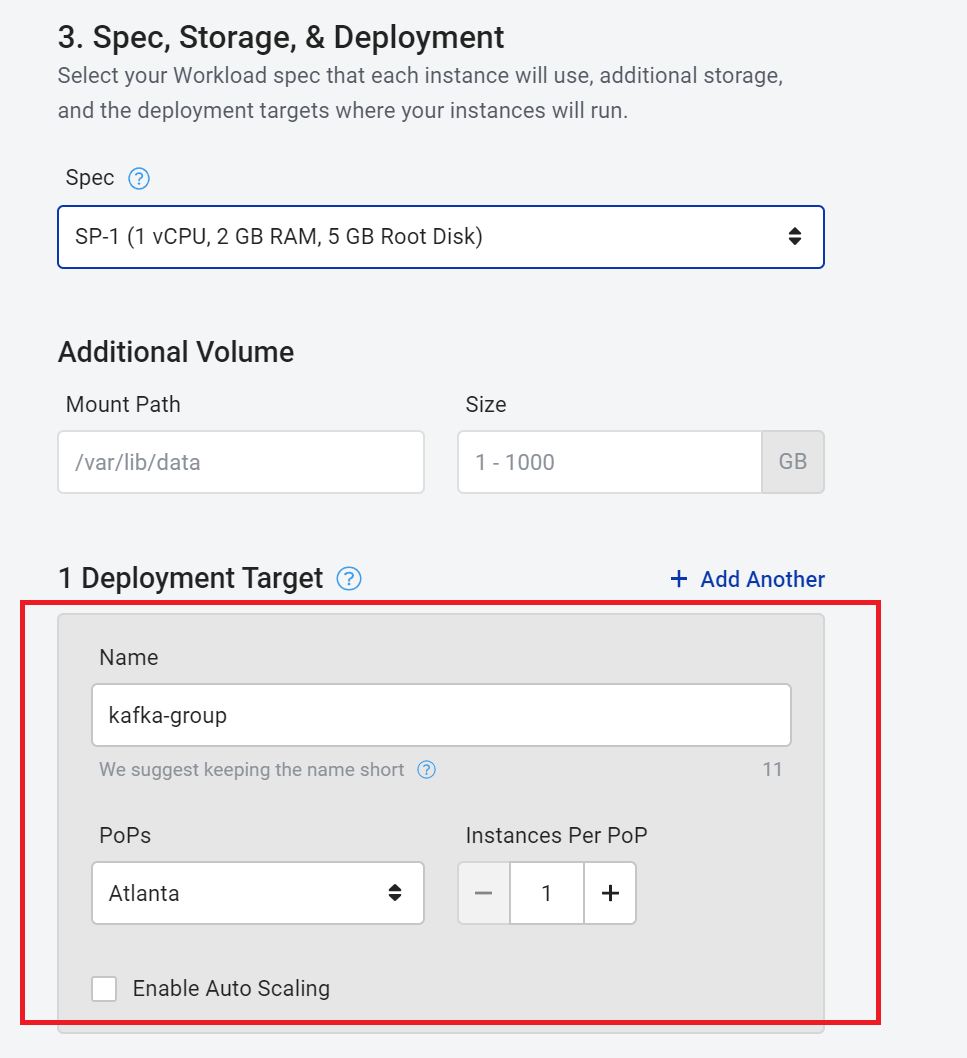
Step 3 – Selecting your Workload spec that each instance will use, additional storage, and the deployment targets where your instances will run.
How to complete this step:
Specify the workload name
Specify the number of instances. For our specific task we will be using two Kafka instances. However, for now we can simply specify one. We can go back and change this.
After you are done , go ahead and save the workload to proceed
Step 4 – Creating the second workload.
How to complete this step
First we want to start the Workload creation process by selecting “Create Workload”.
Go ahead and name your workload. Then we need to select our workload type and our Image. epsilonasi/kafka:3
This will be the workload we use to produce messages for consumption. In this example exercise, the kafka-producer will simply send a test message.
Click Continue
Step 5 – Defining our producer’s environment variables, Networking, Ports, and any custom commands the container requires to run.
Info:
There are a few environment variables we will need to deploy Kafka properly.
KAFKA_CFG_ZOOKEEPER_CONNECT . Set this to your Zookeeper IP address and port number. If you need help locating this, see the information above titled Retrieving the Zookeeper IP address and port number.
ALLOW_PLAINTEXT_LISTENER. Set this to yes . This is a setting that will allow us to easily set up and test our Kafka instances on the edge.
CREATE_TOPIC. We had our consume create our topic already. So we
KAFKA_ROLE. Since we want this container to be a producer, we will tell Kafka that by setting this to PRODUCE
TOPIC. This is the topic that we expect this Kafka container to listen to. For this guide, set it to testTopic
How to complete this step:
First you need to define the environment variables as shown above.
Second, you need to set the public ports if you are using a Kafka instance that is outside the private network available to your Kafka instance.
We do not need to set any commands, and thus your workload settings should appear as such.
Step 6 – Selecting your producer workload spec that each instance will use, additional storage, and the deployment targets where your instances will run.
How to complete this step:
Specify the workload name
Specify the number of instances.
For our specific task we will be using two Kafka instances. However, for now we can simply specify one. We can go back and change this.
After you are done , go ahead and save the workload to proceed.
Step 7 – Check the logs to see kafka in action!
That is it, you are ready to send messages between the two kafka instances. Our container was set up to send a single test message from your Producer to your Consumer So check the container logs to see this happen!
First, check the producer logs. They should look something like this:
 [0m [38;5;2mINFO  [0m ==> ** Starting Kafka setup **
 [0m [38;5;3mWARN  [0m ==> You set the environment variable ALLOW_PLAINTEXT_LISTENER=yes. For safety reasons, do not use this flag in a production environment.
 [0m [38;5;2mINFO  [0m ==> Initializing Kafka...
 [0m [38;5;2mINFO  [0m ==> No injected configuration files found, creating default config files
 [0m [38;5;2mINFO  [0m ==> ** Kafka setup finished! **
 [0m [38;5;2mINFO  [0m ==> ** Starting Kafka **
 [0m [38;5;2mINFO  [0m ==> ** CHECKING TOPIC **
 [0m [38;5;2mINFO  [0m ==> ** CHECKING ROLE **
 [0m [38;5;2mINFO  [0m ==> ** Starting Kafka Console Producer **
Here we see that our kafka container has successfully started, verified that it is a Producer, and started producing messages.
In order to see whether it was sucessfully sent, lets take a look at our consumer logs.
They should look a little something like this:
...
 [0m [38;5;2mINFO  [0m ==> ** Kafka setup finished! **
 [0m [38;5;2mINFO  [0m ==> ** Starting Kafka **
 [0m [38;5;2mINFO  [0m ==> ** CHECKING TOPIC **
 [0m [38;5;2mINFO  [0m ==> ** CHECKING ROLE **
 [0m [38;5;2mINFO  [0m ==> ** Starting Kafka Console Consumer **
THIS IS A TEST MESSAGE FOR THE TOPIC - testTopic
Thats it! You did it!
Conclusion
In this tutorial we learned a few things. Firstly, Kafka is a streaming platform that has three key capabilities:
Publish and subscribe to streams of records, similar to a message queue or enterprise messaging system.
Store streams of records in a fault-tolerant durable way.
Process streams of records as they occur.
And Secondly, Kafka is generally used for two broad classes of applications:
Building real-time streaming data pipelines that reliably get data between systems or applications
Building real-time streaming applications that transform or react to the streams of data
But more importantly, we spent some time deploying Kafka on StackPath and even tested out sending a message from one instance to be consumed by the other! We were able to discuss when and why you would want to deploy Kafka at the edge, and we even showed you how to do it.
For more, we encourage you to visit other StackPath tutorials.