At first you welcome them. You look at them as signs your product and marketing efforts are working. More visitors come, more conversions occur, more revenue is made. These welcoming spikes in traffic, however, can quickly become unwelcome. They can compromise the performance of your website, the security of your server, and ruin the user experience.
Traffic spikes don’t have to be two-faced though. With a proper load balancing solution, they always represent what they’re supposed to: $ and 🙂
In this post, we’ll go over the different types of load balancing. We’ll also go over the powerful, open source load balancing software HAProxy, then tell you how to install it. HAProxy plays a part in our Origin Shield feature, and you can use it for your own load balancing purposes as well.
Understanding Load Balancing
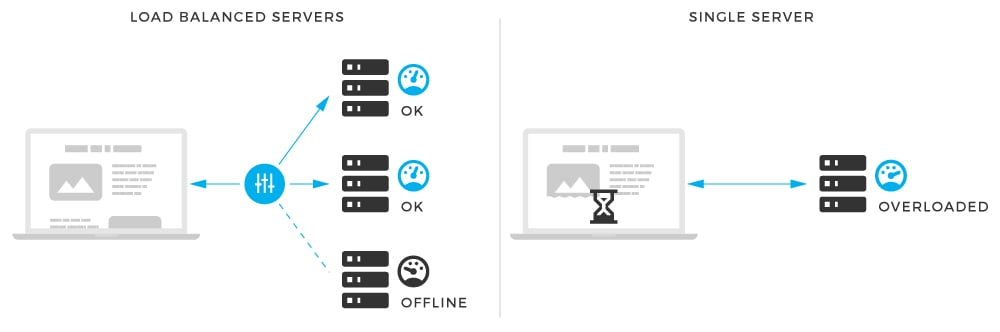
Load balancing ensures the availability, uptime and performance of your servers, websites and applications during traffic spikes. It’s especially important for companies with multiple data centers and high traffic websites or apps.
A performance optimization tactic that provides fault-tolerance by splitting incoming tasks across multiple computing resources, thereby preventing any one resource from becoming overloaded.
To further explain, a load balancer is a workload distributor across multiple computing resources. These resources can be computer clusters, network links, CPUs or disk drives.
Load balancing aims to achieve optimal resource usage, maximize server stability, and prevent individual components from becoming overloaded. It divides the amount of work that a server has to do between two or more servers, allowing more work to get done in the same amount of time.
Understanding Different Types of Load Balancing
Load balancing can be performed with one of the following.
DNS
Hardware
Software
First we will briefly explain these different types of load balancing. Then we’ll show you how you can use HAProxy (open source load balancing software) to mitigate unwanted behavior during traffic spikes.
Load Balancing with DNS
DNS has the ability to load balance a domain over multiple servers. When performing traffic load balancing with DNS, you don’t have any control over the balancing algorithm. It always uses round robin to dedicate a server it has listed for a given record.
Also, DNS caching can be very limiting. If a server becomes unavailable in the listed pool, DNS still provides the IP address to clients that are sending the requests. This can continue for hours until that DNS record is removed and all instances of that record expire from every DNS servers cache.
Load Balancing with Hardware
Hardware load balancing is a common method for balancing traffic. This is achieved by having a dedicated hardware device that handles traffic load balancing. Most dedicated hardware load balancers are simply servers running Linux. Either that or an embedded Linux distribution with some management tool that allows ease of access and a configuration overview.
The downside of load balancing with hardware is that it’s very expensive. While considered the most reliable (less chance of capping or dead-locking), set up right, software load balancing can perform just as well, and with much less resources.
Load Balancing with Software
Software-based load balancing is a very powerful and reliable method for distributing load between servers. As it’s name suggests, software performs the balancing of requests usually on a Linux platform with a wide variety of algorithms for server allocation. One of these solutions is IPVS, a powerful load balancer that’s been included in every Linux kernel since version 2.4.
However, the solution we always happily choose is HAProxy.
HAProxy: Kick-Ass Load Balancing Software
HAProxy (High Availability Proxy) is used for TCP and HTTP-based applications. Over the years it has become the standard for open source load balancing. It’s also free and comes with most Linux distributions.
What MaxCDN Uses It For
MaxCDN uses HAProxy as a second-level point of failure between our edge servers and the origin server of customers with Origin Shield. It works by switching traffic intelligently between our Origin Shield servers so no one becomes overloaded.
Because Origin Shield servers can come under a lot of stress from handling heavy loads of traffic between edges and origin, an effective load balancer is needed. In this scenario, the load balancer (HAProxy) switches traffic between two Origin Shield servers in order to remove stress from any one server.
Before the load balancer comes into play, we use Nginx to perform the 1st level load balance.
What You Can Use It For
As mentioned at the beginning of this post, it’s highly recommended to use some sort of load balancing solution in your company’s infrastructure – especially if you have a high traffic website and traffic spikes.
Below we will show you how HAProxy can be implemented in a simple situation using Round Robin. First though, let go over the Round Robin algorithm and other algorithms HAProxy offers.
HAProxy Algorithms
Round Robin: This algorithm is the most commonly implemented. It works by using each server behind the load balancer in turns, according to their weights. It’s also probably the smoothest and most fair algorithm as the servers’ processing time stays equally distributed. As a dynamic algorithm, Round Robin allows server weights to be adjusted on the go.
Static Round Robin: Similar to Round Robin, each server is used in turns per their weights. Unlike Round Robin though, changing server weight on the fly is not an option. There are, however, no design limitations as far as the number of servers is concerned. When a server goes up, it will always be immediately reintroduced into the farm once the full map is recomputed.
Least Connections: With this algorithm, the server with the lowest number of connections receives the connection. This type of load balancing is recommended when very long sessions are expected, such as LDAP, SQL, TSE, etc. It’s not, however, well-suited for protocols using short sessions such as HTTP. This algorithm is also dynamic like Round Robin.
Source: This algorithm hashes the source IP and divides it by the total weight of running servers. The same client IP always reaches the same server as long as no server goes down or up. If the hash result changes due to the changing number of running servers, clients are directed to a different server. This algorithm is generally used in TCP mode where cookies cannot be inserted. It’s also static by default.
URI: This algorithm hashes either the left part of the URI, or the whole URI and divides the hash value by the total weight of running servers. The same URI is always directed to the same server as long as no servers go up or down. It’s also a static algorithm and works the same way as the Source algorithm.
URL Parameter: This static algorithm can only be used on an HTTP backend. The URL parameter that’s specified is looked up in the query string of each HTTP GET request. If the parameter that’s found is followed by an equal sign and value, the value is hashed and divided by the total weight of running servers.
Installing HAProxy with Round Robin
When showing you how to install HAProxy below, we’ll also use a simple configuration that has two servers: Server 1 and Server 2. These servers sit behind the HAProxy load balancer as seen in the illustration.
There are three areas of interest in this scheme:
HAProxy: Load Balancer, installed on Ubuntu 14.10 OS, with a private IP 10.10.10.10
Server 1: Ubuntu 14.10 OS with LAMP and a private IP 10.10.10.1
Server 2: Ubuntu 14.04 OS with LAMP and a private IP 10.10.10.2
To install HAProxy on the Ubuntu operating system, you should run the following command:
apt-get install haproxy
In order to manage HAProxy via an init script, the following change has to be done:
nano /etc/default/haproxy
ENABLED=1
Now we can control HAProxy with an init script with the following options:
$ service haproxy
Where the option can be:
start reload restart status stop
The HAProxy configuration for this example is set up in the following way:
nano /etc/haproxy/haproxy.cfg
listen MaxCDN-HAProxy 10.10.10.10:80
mode http
stats enable
stats uri /haproxy?status
balance roundrobin
server Server01 10.10.10.1:80 check
server Server02 10.10.10.2:80 check
server Backup   10.10.10.3:80 backup
For the purpose of testing the responses from the servers, the index.php files in /var/www/html/index.php on each server were populated with the following values:
Server #1
and
Server #2
In order to test the load balancing, the HAProxy’s private IP has been included in the address bar. The first time, the response was Server #1. Upon another request, the response was Server #2, simulating the load balancing within these two servers.
First Request
Second Request
Additionally, we could have used a backup directive. That’s what flags NEW server in this chain as a backup one. It’s used in case both primary servers go down and helps us avoid inconveniences like 503 Service Unavailable. The backup server won’t be used as long as at least one of the primary servers is up and running.
Finally, we can see a graphic representation of server status and uptime by visiting 10.10.10.10/haproxy?status as shown in the image below:
Conclusion
As shown above, HAProxy is very easy to install and configure. It also has a lot to offer in terms of flexibility, reliability and performance. We’re happy with it at StackPath, and definitely recommend it for other load balancing endeavors.