Reliable video streaming is becoming more important but is still quite demanding in terms of administration and resources, especially if you’re serving a global viewer base. In this article, we’ll show you how to use StackPath’s CDN, Edge Compute, and Object Storage with Unified Streaming’s Unified Origin product to deploy a globally distributed video streaming workflow that maximizes performance and minimizes costs.
Introduction
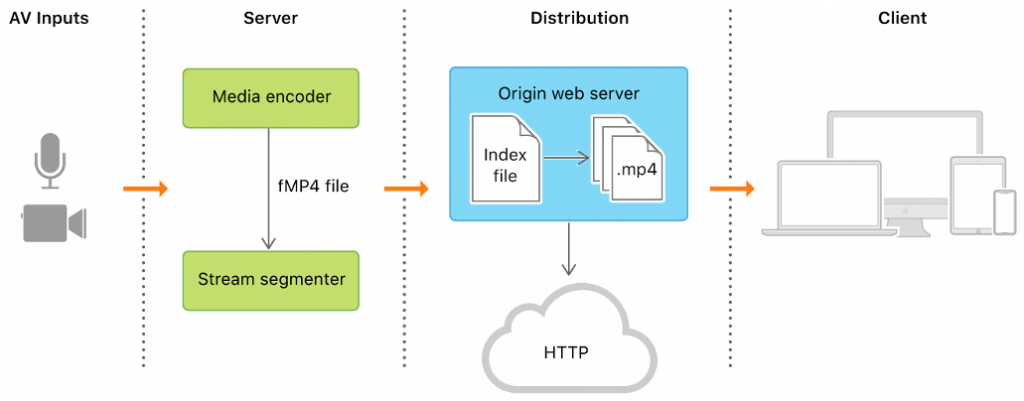
Modern video streaming technologies on the web such as HLS and DASH mostly rely on chunked transfer of media content using a particular set of codecs or encoding configurations.
Starting with a video source, whether captured live or produced using software, the standard video streaming workflow requires the transcoding of this source media into the required codec. The source media must also be segmented into chunks, be indexed in a manifest/index file, and serve the resulting files to the client over a standard HTTP(S) connection.
Typical media streaming workflow (credit: Apple)
The classic solution for video streaming is to deploy all-in-one streaming server software (e.g. Mist, Nimble, Red5, Wowza) on a powerful, dedicated server with enough storage space for input video files and variations, enough processing power for transcoding and muxing, and enough resources to handle the heavy load of video streaming connections.
But the modern trend of web development and DevOps is to rely on discrete components (e.g. microservices) that are simpler, more reliable, specialized, and can be deployed to scale quickly and easily. In this case, detaching the three components of storage, transmuxing, and file serving can reduce costs and challenges. It also enables developers to deploy as many units as necessary in any point of presence (PoP) around the globe.
The StackPath platform provides all the components necessary for a developer to deploy a reliable video streaming setup quickly and efficiently while Unified Streaming provides the necessary streaming software. Below, after reviewing this software, we’ll show you how to use it with StackPath’s Object Storage and Edge Compute Containers to launch an enhanced video streaming solution.
Unified Origin
Unified Origin is a software package by Unified Streaming that can run as a standalone container or as a plugin to a standard web server such as Apache. It simplifies the workflow of video streaming by providing on-the-fly segmenting and indexing of input media into HLS, DASH, HDS, or HSS streams. This removes the need for output storage (one only has to upload input content) and allows developers to deploy as many containers as needed to as many PoPs as needed with very little configuration.
A pre-configured and ready-to-stream image of Unified Origin is available for StackPath’s containers which we’ll use in this tutorial.
Architecture
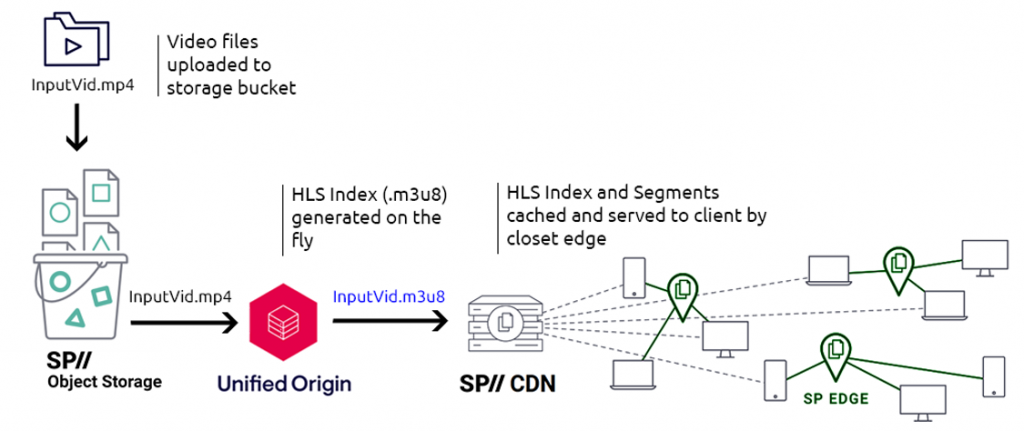
The diagram below shows the architecture of our solution and how its components interconnect.
Media files are stored on StackPath’s Object Storage and a Unified Streaming edge compute container is deployed and configured to be used as an input and origin for a CDN site. Once that is complete, CDN links become available to serve to the end user immediately in a variety of formats. The generated files (.m3u8 index and .ts segments) are cached by the CDN without being stored in the storage bucket.
Another advantage to this setup is that egress from Object Storage or ingress for CDN over the StackPath network is free and does not count towards a user’s bandwidth allocation.
This tutorial will walk you through the four steps needed to set up this video streaming workflow:
Setting Up Object Storage
Uploading and Managing Files on Object Storage
Setting Up Unified Origin
Setting Up the CDN
Video Streaming Workflow
Setting Up Object Storage
Before getting started, you need to create a StackPath account. After doing this and logging in, you need to choose your service type. As the objective here is to serve content, select Website & Application Services.
Now choose the services you require. The Edge Delivery Bundle is recommended, but the bare minimum is the CDN service.
To add Object Storage to your site, click Object Storage on the left-side menu in the control panel. After doing this, you’ll see two options: create a bucket and generate credentials. We will do both.
First, create a bucket by clicking the button and filling in a name and region. The bucket name will become part of the bucket url. For example, if you call it unifiedtest1, and assign it to the eu-central region, the resulting bucket URL will be unifiedtest1.s3.eu-central.stackpathstorage.com.
Once your bucket is created, you will arrive on the bucket overview page. Take note of the bucket url and endpoint as we’ll need them to create a site and upload files to the bucket.
Now we need to generate credentials to use for managing the bucket. Head back to the Object Storage page and click Generate Credentials. Take note of the generated keys and keep them safe.
Uploading and Managing Files on Object Storage
Object Storage is fully compatible with AWS S3, meaning there’s a variety of tools you can use to access and manage files. In this step we’ll highlight two popular tools: a CLI (AWS CLI) and a GUI (CyberDuck).
In both cases, you’ll need three pieces of information (which you acquired in the previous step):
Endpoint url
Access key
Secret key
The access and secret keys are unique to your bucket and you can re-generate them using the control panel in the same way you generated them. As for the endpoint url, it is constant for every region. For example, for eu-central, this is s3.eu-central.stackpathstorage.com. You can find this in the bucket overview page.
Option 1: AWS CLI
The AWS CLI is a is a universal CLI for AWS services including S3 storage which StackPath’s Object Storage is fully compatible with.
First, install the cli by running the command corresponding to your version of Python.
pip install awscli
pip3 install awscli
You can also use one of the bundled installers available on the AWS page for several operating systems.
Next, get the endpoint url for your bucket and use it to issue this command.
For example:
aws s3 ls --endpoint-url=https://s3.eu-central.stackpathstorage.com
Now you’re all set. You can use the file management commands to upload/download and manage files.
CyberDuck is a popular GUI tool for remote file management that supports a variety of protocols on both Windows and Mac clients. The steps are straightforward and similar to the way you’d access an ftp server.
Start CyberDuck and click Open Connection in the upper left corner.
Select Amazon S3 from the drop down menu and enter the same details referenced above. The server field in this case expects your endpoint url.
Click Connect and that’s it! You’re now connected to your bucket and can manage files by dragging and dropping or using the standard GUI tools.
Files you upload are now accessible at your bucket url (e.g. http://unifiedtest1.s3.eu-central.stackpathstorage.com).
Setting Up Unified Origin
To provide on-the-fly packaging of mp4 media files in the form of HLS or DASH streams, we’ll utilize Unified Streaming’s Unified Origin, deployed on a StackPath Edge Container.
Unified Origin, when deployed in its container form, is an http server that serves HLS (and other streams) as if they were stored on its disk, while actually pulling media files from remote storage (a bucket), packaging them, and delivering the required indices/segments. (You can find the documentation for Unified Origin here.)
StackPath’s Edge Compute Containers offer a way of hosting containers in diverse locations so that requests don’t have to travel all the way to a centralized computing node. With Anycast IP enabled, a static IP is assigned to the workload. Traffic that hits the IP is routed to the StackPath Network at the closest Edge Location, then to the container instance through StackPath’s private network backbone.
To start, head back to the control panel and click Workloads. Then click Continue to add Edge Compute to your Stack.
Now click Create Workload.
Specify the configuration for your container:
Name: anything
Image: enter unifiedstreaming/origin:latest, which refers to this container
Image Pull Credentials: no
The second step includes the ability to set environment variables, which is the main way to configure the container. Referring to the documentation, we fill in the required variables.
Public Path for remote storage, defaults to “remote”
S3_SECRET_KEY
secret key for authentication
[[bucket secret key]]
S3_ACCESS_KEY
access key for authentication
[[bucket access key]]
As for the rest of the settings:
Public Ports: 80
Spec: The resources allocated to each instance. This will vary depending on your load, but we’ll go with SP-2 for now (2 vCPU, 4GB Mem, 10GB Root Disk).f
Deployment Target: Targets are groups of instances running within the selected PoPs for which you can set common settings. Provide a name and one or more locations based on your viewer base.
Finally, click Create Workload. You’ll be redirected to the container’s overview page where you’ll see it starting. When you’re done, click the instance to see the IP addresses associated with it or head to the Workload overview page.
Note the remote management toggle switch here. This allows you to access the management shell for your container. After enabling this, you can access your container’s shell using the command available on the container’s page.
For remote management of this origin container, you may need to modify “/bin/bash” to “/bin/sh” to successfully reach this Docker Image. If you make any changes on the Origin container, it will require an Apache restart, so ‘httpd -k restart’ may be needed.
Assuming you’ve set your environment variables correctly, Unified Origin is now ready to serve streams at the url you configured.
Setting Up the CDN
The required end result is a CDN site to serve streams from the container. So now we need to create a site that pulls from the container, caches files, and delivers video to client devices.
To get started, click Sites in the left-side menu of the StackPath control panel. Then click Create Site.
Enter the domain name you’ll use to serve content to clients and enable the CDN service.
Now you can access your streams at either the domain name you provided or the site’s edge address which is available on the Overview page.
Putting it All Together
To test our setup, let’s upload some media files into object storage and test streaming. If you’re using the evaluation license for Unified Origin, demo content is provided to help you get started, and you also can upload your own video content. So head over to the evaluation page to download the content or use this direct link.
After this, download the zip file in the link above, decompress it, and use either of the two methods in the file upload step to upload your files into /unifiedtest1/ at the root of your bucket.
This path was configured in the environment variables when we started the Unified Origin container; specifically in the REMOTE_STORAGE_URL key.
You should now have the following files in your bucket.
Point your browser to the IP address of your container, path /remote/ to verify that it’s working. The full link in our case would be http:///remote . This path was also configured in the environment variables when we started the Unified Origin container; specifically in the REMOTE_PATH key, which we left empty and thus it defaulted to “remote”.
You should be able to play the files you uploaded using any of the supported protocols. Alternatively, you can use this test page for HLS.js, VLC Media Player, or any media player supporting HLS/DASH streaming—then load the following link (substituting your container’s IP):
http:///remote/tos.ism/.m3u8
For using the CDN Edge Address or your domain name, we use this link:
This tutorial showed a basic yet reliable video streaming workflow using the StackPath platform and Unified Origin.
For use in production, some extra configuration for Unified Origin might be needed. In particular, it might be desirable to fix the hostname and allow access only to the StackPath CDN. Additionally, setting up your own multi-quality streams may require the generation of server manifests (.ism files).
For more information, you can refer to Unified Streaming’s documentation on this page.